
Changing Your S2000’s Coolant? Six Things to Consider While You Are There
From ageing hoses and a hard-to-reach sensor to coolant and intake temperature control
Part of our Honda S2000 Restoration & Tuning Journal Series
When was the coolant in your S2000 last changed?
More importantly, what else was done at the same time?
Honda’s maintenance schedule specifies the first coolant replacement at 120,000 miles or 10 years, followed by replacement every 60,000 miles or five years, whichever comes first.
On that schedule, a 15-year-old car should have reached its second change, a 20-year-old car its third and a 25-year-old car its fourth. The service history should help us understand what has actually happened.
However, fresh coolant does not mean that everything around it has been refreshed.
The radiator, hoses, thermostat and associated components may still be the parts fitted when the car was new.
A coolant change is not a particularly large job. Nevertheless, draining the system creates an opportunity to combine it with other work.
Today, I would like to introduce six areas worth considering, using our demonstration S2000 as the example. Some concern preventative maintenance. Others will be particularly interesting if you are developing your car for circuit use.
The useful question is: while the system is empty and access is available, what would you rather complete now than return to later?
1. The Radiator—and the Switch That Starts the Fan
The first decision concerns the radiator itself.
Replacing an ageing radiator with a new stock unit is a perfectly reasonable choice. If the original arrangement suits your car, a refresh does not have to become a change of concept.
For those wanting additional capacity, CSOhara offers a wider-core radiator retaining the stock style of construction. A quality Japanese aluminium radiator is another option, particularly if its appearance is also part of your engine-bay project.
I would put quality and an established record ahead of the lowest price.
A radiator must remain dependable through repeated heating and cooling, vibration and the conditions encountered on the road or circuit. An inexpensive copy becomes much less attractive if its construction leaves you dealing with a leak away from home.
Choose a product whose manufacturer and intended application you understand.
While attending to the radiator, consider the fan switch too.
A low-temperature fan switch starts the cooling fan at a lower coolant temperature than the stock switch. It changes when the fan begins helping airflow through the radiator.
It does not turn the radiator into a larger radiator, and its role differs from that of the thermostat, which we will discuss shortly.
This is a familiar component in a track-oriented cooling setup. However, there is also a practical road application: an S2000 regularly sitting in city traffic, where there is little natural airflow through the radiator.
Our demonstration S2000 uses a SPOON low-temperature fan switch. It is one of the small components we considered as part of the complete cooling arrangement, rather than as an isolated upgrade.
New Spoon Sports’ Low-temp Fan Switch and the 75K miles old stock switch
2. Refresh the Radiator Hoses—and Remember the Heater Hoses
Old radiator hoses can become remarkably hard.
If you are removing them during a cooling-system refresh, it is a good time to decide whether you really want to put the same ageing hoses back.
For our demonstration car, we chose SAMCO silicone hoses.
SAMCO is a British manufacturer with an established identity and production history. That matters to me. I prefer knowing who made a component that will spend its working life carrying hot coolant.
There are other products available, but colour alone would not persuade me to choose one.
Allow time for procurement too. For a made-to-order set, I would plan roughly three months ahead rather than assume the hoses will be ready when the car enters the workshop. Confirm the actual lead time when ordering.
That makes this a sensible winter project to organise in advance.
The large radiator hoses are only part of the job.
There are also smaller hoses serving the heater circuit. These are less prominent when looking into the engine bay, but they deserve attention during a more thorough refresh.
My preference is to renew suitable ageing stock hoses while replacements remain available. Individually, they need not be especially expensive. Returning later to reach one neglected hose can be a less attractive proposition.
In the work described here, we drained the coolant, removed the radiator and hoses, and also removed the intake manifold to continue with the less accessible components.
Removing the intake manifold is additional work for this combined project; it is not necessary for an ordinary coolant change.
Once we have chosen to go that far, however, it makes sense to use the access properly.
Fresh and ageing rubbers
3. Use the Access to Replace the Knock Sensor
The knock sensor sits beneath the intake manifold, on the left side of the engine.
It is not a particularly convenient place to reach with everything assembled.
Age-related knock-sensor faults are a familiar maintenance issue, and the S2000 is no exception. If we are already removing the manifold for the surrounding work, this is a useful moment to consider a stock replacement.
The sensor provides information used by the engine management system to identify knocking. Replacing it is preventative maintenance, rather than a modification intended to create additional power.
The decision is also about access.
Would you rather replace the ageing sensor while it is exposed, or reassemble the car and potentially repeat the dismantling later?
The photograph of the new Honda sensor makes this part of the project quite straightforward to explain. We are taking an awkwardly positioned component and dealing with it while the surrounding work gives us the opportunity.
This approach follows the thinking behind our earlier crank-pulley article: an ageing component can deserve attention even before its condition becomes the reason the car enters the workshop.
A brand-new stock knock sensor for Honda S2000
4. Choose the Thermostat for the Way You Use the Car
A thermostat controls coolant flow through the radiator as the engine warms up and operates.
After many years of service, it is another component I would consider renewing while the system is drained.
There are two directions to consider: a fresh stock thermostat or a low-temperature alternative.
A low-temperature thermostat begins opening earlier. Unlike the fan switch, it changes the temperature at which coolant flow through the radiator begins, rather than when the electric fan starts.
For a circuit-oriented S2000, this forms part of a more deliberate approach to managing coolant temperature.
When thinking about a roughly 15-minute session at sustained high load, keeping coolant temperature below approximately 85°C is a target I am interested in pursuing. The aim is to manage heat accumulation throughout the session, rather than simply recover from a high reading afterwards.
However, fitting a low-temperature thermostat does not guarantee that temperature. The radiator, airflow, coolant circulation and operating conditions still determine what happens.
The thermostat is one part of the arrangement.
Our demonstration car uses a CSOhara low-temperature thermostat. For a car used in a cold climate, I would favour the stock arrangement rather than automatically copy our track-oriented specification.
Choose according to how and where your S2000 operates.
You can explore the thermostat and radiator options in our CSOhara S2000 engine-parts catalogue.
75K miles old stock thermostat and a brand-new CSOhara low-temp one
5. Address Heat Transfer into the Intake
With the intake manifold removed, there is another opportunity: consider how heat reaches the intake assembly.
We used an intake-manifold insulation gasket and a coolant bypass arrangement on our demonstration S2000.
These address two different paths by which the intake can become heated.
The Intake-Manifold Insulation Gasket
The insulation gasket sits between the cylinder head and intake manifold, reducing direct heat transfer across that connection.
Its appeal is in small improvements.
If you are interested in circuit development, reducing intake temperature even slightly may be worth pursuing alongside other changes. The objective is to reduce unwanted heating of the incoming air during demanding use.
However, I cannot show you a measured lap-time improvement from this gasket alone.
We have fitted it to our demonstration car, but we have not completed a controlled back-to-back comparison isolating its effect. Nor would I describe it as a modification that produces a dramatic change from the driver’s seat.
Adding insulation changes the heat-transfer path. How much that matters during a particular session is a separate question.
For somebody looking for an obvious transformation from one component, it may not be the first purchase.
For somebody already removing the manifold and interested in accumulating small improvements, it becomes more relevant.
That is how I view it.
CSOhara Intake Manifold Insulation Gasket kit
The Coolant Bypass
The S2000 also has a coolant heating circuit associated with the intake assembly.
Heating has a purpose in cold conditions. For a circuit-oriented car, however, we are interested in reducing heat entering the intake.
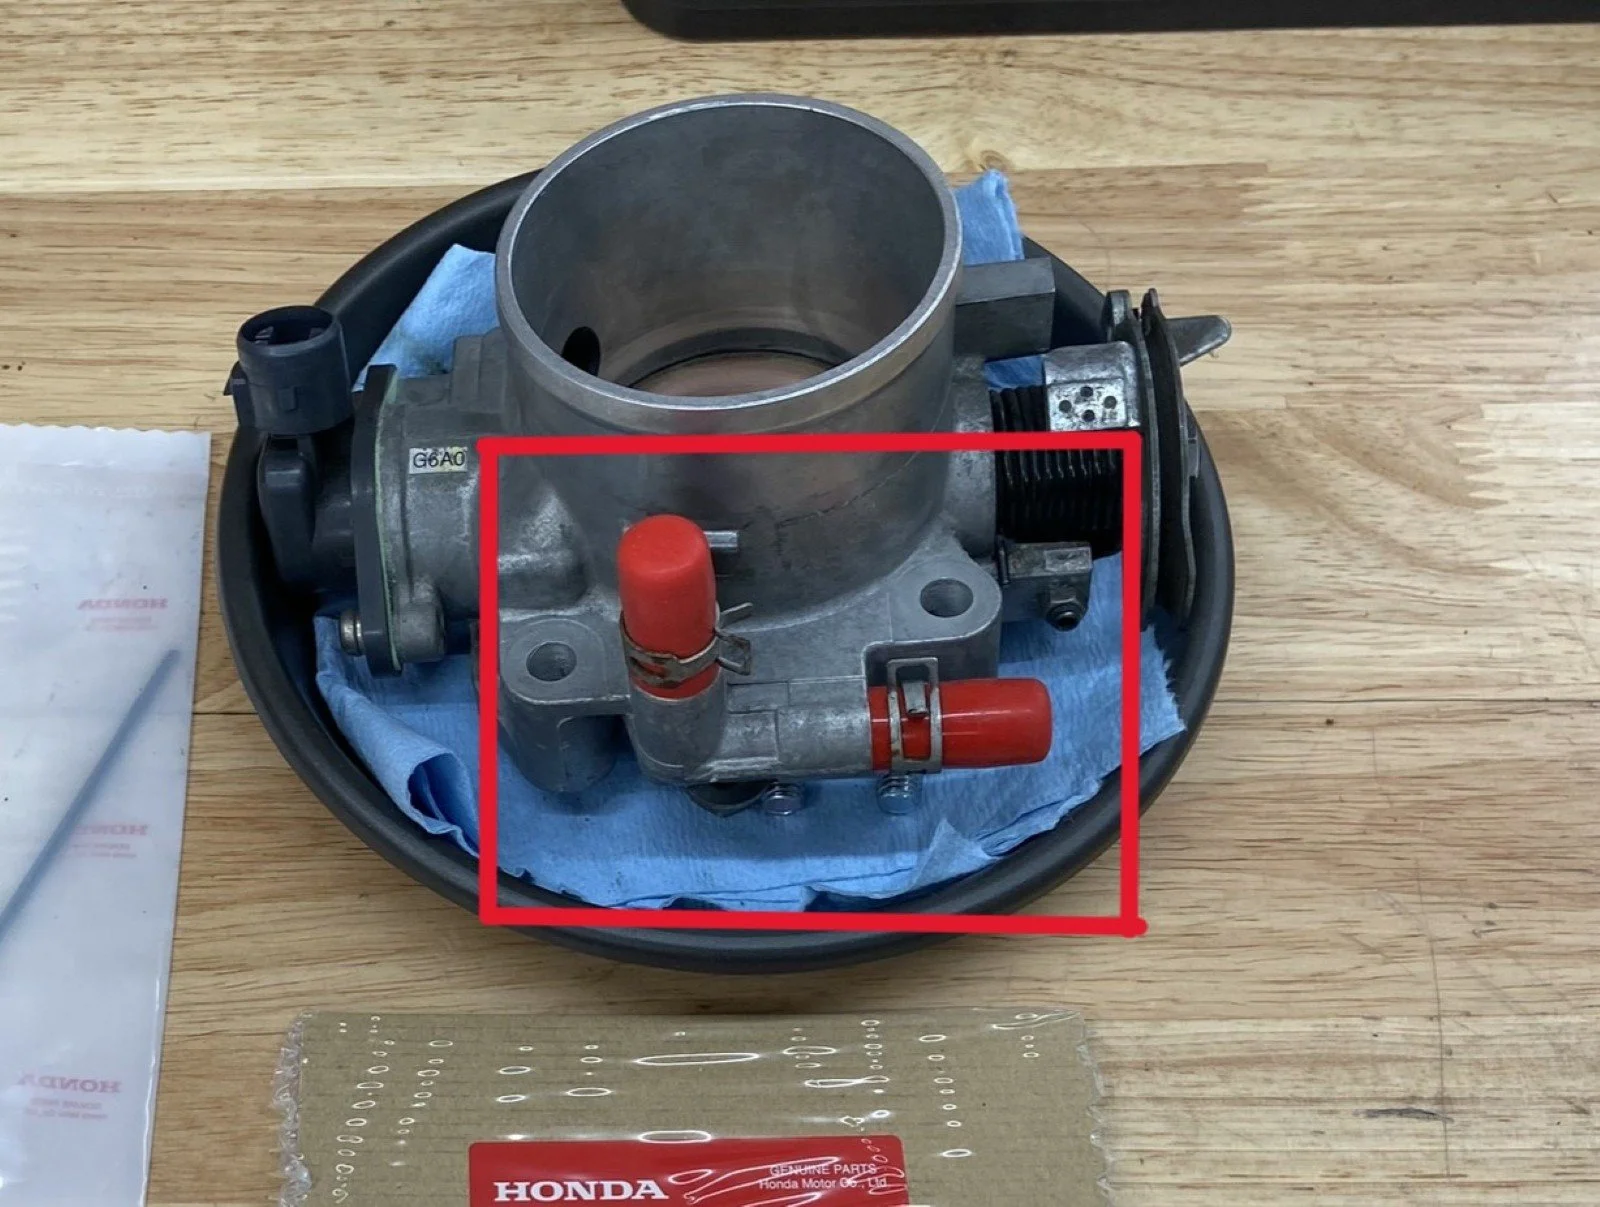
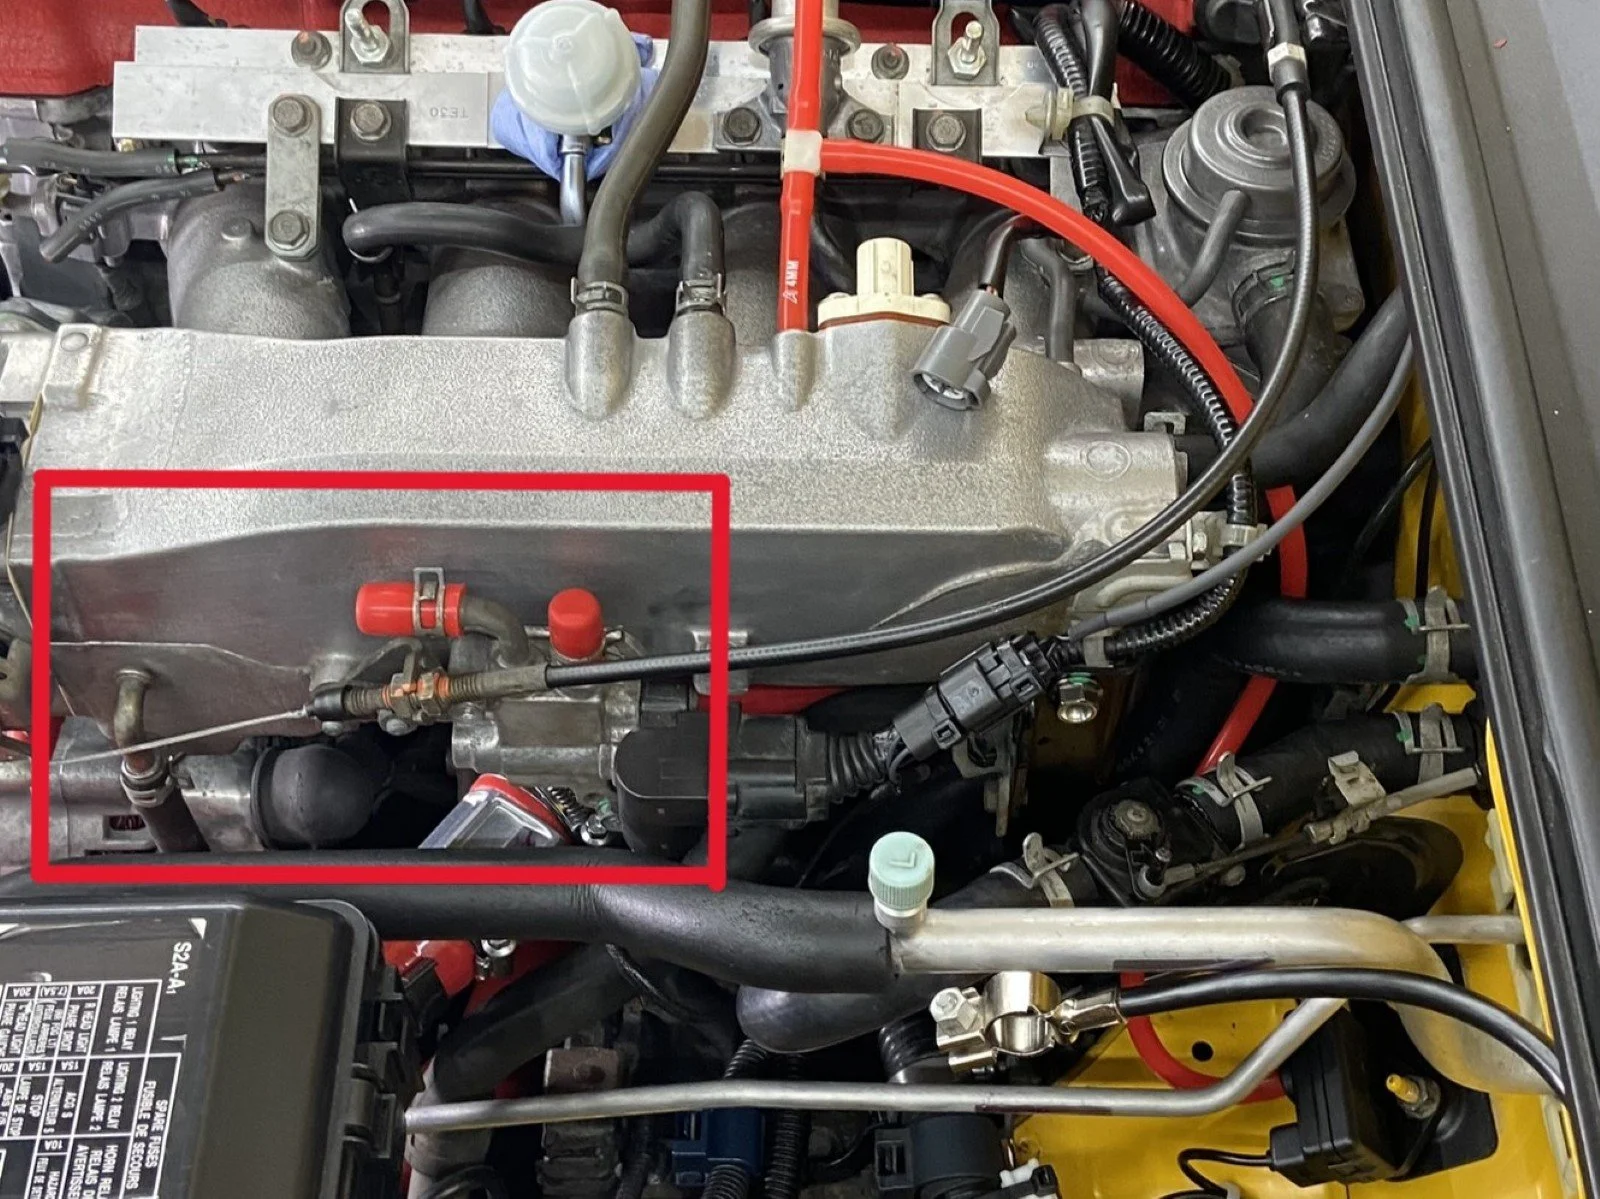
The CSOhara kit reroutes the relevant coolant circuit to remove that source of heating. This is a different intervention from adding an insulation gasket: one addresses the coolant route, while the other addresses heat transfer through the manifold mounting joint.
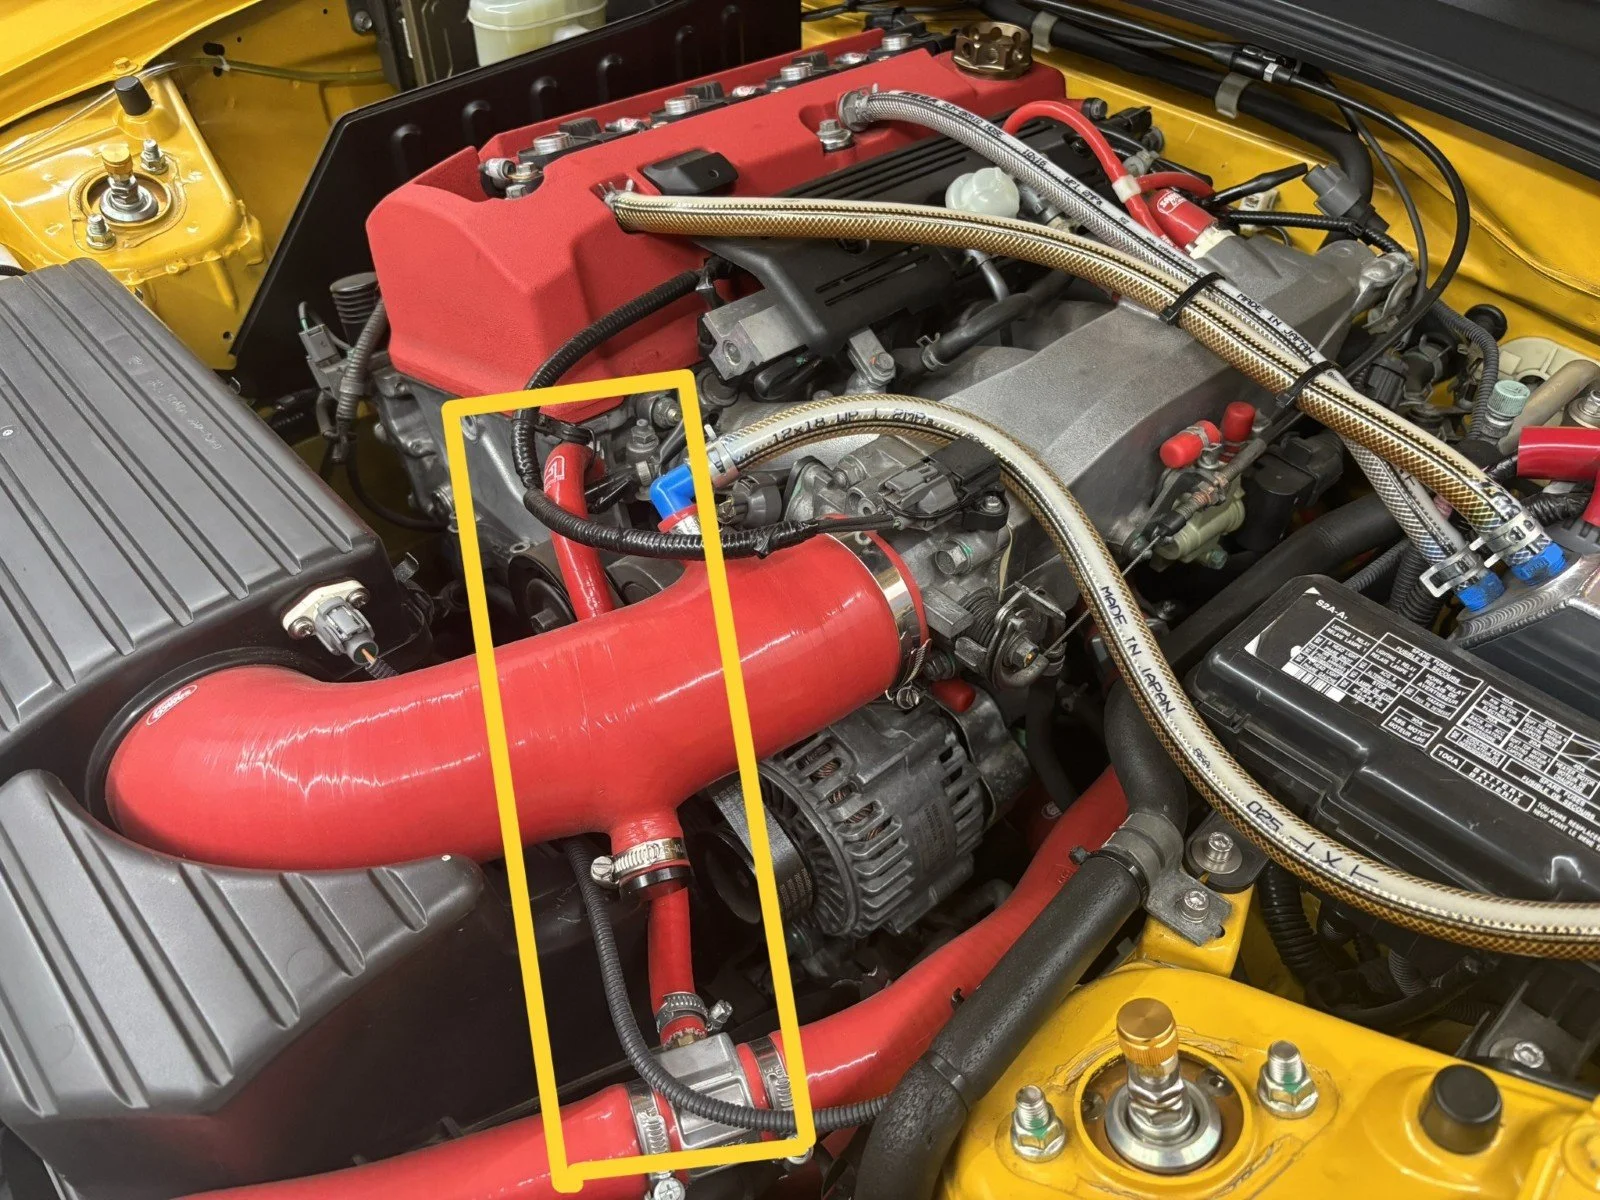
The photographs show the connections and the installed route on our car.
Climate matters here too. CSOhara specifically states that the kit is unsuitable where the heating circuit is needed in colder conditions.
You can see the arrangement and installation requirements on our Coolant Breather Heating Waterway Diversion page.
For our project, the two changes belong together because we are considering intake temperature as well as coolant temperature.
6. Fit a Water-Temperature Sensor—and Follow the Readings
Finally, consider how you will monitor the result.
While fitting a new radiator hose, we installed a water-temperature sensor so that we could follow coolant temperature during use.
A numerical reading lets us ask more useful questions.
What happens during a circuit session? Does the temperature continue climbing? How quickly does it recover when the load reduces? What happens while waiting in traffic?
Those observations help us assess the complete cooling arrangement.
Simply fitting a low-temperature thermostat or a larger radiator does not tell us how the car behaves. Monitoring makes the next stage of development more informed.
There is a practical consequence to the installation, however.
Cutting a hose to fit a sensor adaptor adds connections. Those joints, hose clamps and the surrounding hose become additional inspection points.
I would recommend this route to an owner prepared to check the installation regularly, including looking for coolant traces and checking the coolant level.
The monitoring equipment should support a habit of paying attention to the car.
Once the work is assembled, the system must also be refilled and bled correctly, then checked for leaks and normal operation.
That completes the work; fitting the final component is not the end of the job.
SAMCO Upper Radiator Hose with the water temp sensor and the bypass kit installed
Plan the Work Before the Coolant Comes Out
We have covered two closely related purposes.
The first is refreshing ageing components: the radiator, hoses, knock sensor and thermostat.
The second is developing a cooling and intake arrangement suited to the way the car will be driven.
For a road car, that may mean retaining the stock specification while renewing tired parts.
For a circuit-oriented S2000, it may include a different thermostat, earlier fan operation, intake insulation, a coolant bypass and more useful temperature monitoring.
The opportunity is to plan these decisions together.
Some work shares the drained cooling system. Other work becomes practical once we choose to remove the intake manifold. Combining it thoughtfully can avoid returning to the same area several times.
Last week, our driveshaft restomod combined inspection, fresh consumable parts and a targeted change to joint movement. This cooling project follows a similar approach: attend to age-related deterioration, then make purposeful changes for the intended use.
For this part of our circuit development, the temperatures we are concentrating on are coolant temperature and intake-air temperature.
We want to understand both, manage the sources of heat and observe what happens when the car is driven.
What Would You Include in Your Next Coolant Change?
Perhaps your S2000 needs fresh stock hoses and a thermostat.
Perhaps you are planning a winter refresh before next year’s track days.
Or perhaps the first step is to understand the cooling components already fitted to your car and establish what temperatures it reaches.
TR imports UK can help you plan the parts and workshop work around that goal.
Tell us how you use your S2000, what has already been replaced and what you would like to achieve at the next coolant change.
See the Complete S2000 Restoration
Explore the complete restoration and development of our demonstration S2000—and the workshop experience behind it: